The best and most complete button guide to Instant Pot Duo Version 2.
When you first open your Instant Pot you may be overwhelmed by all the buttons and settings. Fear not! Pressure Cooker Passion has a put together a complete Instant Pot button guide for the best selling Instant Pot Duo Version 2.
Instant Pot Button Guide (478 downloads )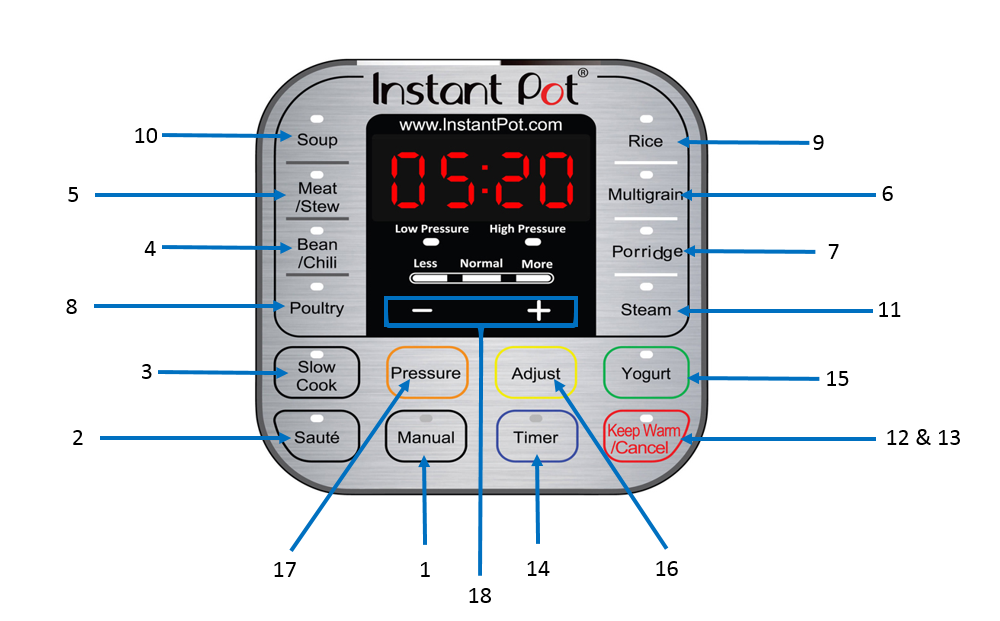
1. Manual / Pressure Cook Buttons*
- Most Used Button
- Pressure Cook and manually select time
- Default Temperature is “High Pressure”, change temperature with the pressure button
- Change time with “+/-“ buttons
- Recipes with this button usually call for ½ Cup to 1 Cup of liquid
* The new models of the Instant Pot have the “Pressure Cook” button and old models use the “Manual” Button
2. Sauté Button
- Acts as a skillet, pan or pot
- Add cooking oil or fat and use as you would on a stove top
- Used when recipe calls for browning meat, cooking down vegetables such as onions, garlic or peppers, or reducing the amount of liquid
- Sauté temperature can be adjusted with the “Adjust” button
- Normal mode: 320 to 349°F
- More mode: 347 to 410°F
- Less mode: 275 to 302°F
3. Slow Cook Button
- Allows your Instant Pot to function like a slow cooker
- Defaults to a 4 hour cook time, but you can use “+/-“ buttons to change the cook times
- You can make all your favorite slow cooker recipes with this button.
4. Bean / Chili
- Preset button for Beans / Chili
- Defaults to a 30-minute cook time at High Pressure
- You can change the default setting to “More”, High Pressure 40 Minutes or “Less” High Pressure 25 Minutes.
- The Instant Pot Manual will have the recommended cook times for beans and legumes
5. Meat / Stew
- Preset button for Meat / Stew
- Default to a High Pressure for 35 minutes.
- You can adjust for “More” to High Pressure for 45 minutes or “Less” for High Pressure for 20 minutes.
- Use “More” or “Less” based on your desired texture, i.e. “More” will be for fall-off-the-bone meat.
6. Multigrain
- Preset for Multigrains, such as wild rice, brown rice, mung beans, or hard grains like buckwheat, flax, millet.
- Consult Instant Pot manual for recommended cook times and multigrain to water ratio.
- Defaults to “Normal” setting for 40 minutes cook time, “Less” setting is 20 minutes, or “More” at 45 minutes of warm water soaking and 60 minutes
7. Porridge
- Preset for “Porridge” such as rice porridge (congee) or oatmeal
- Default to a High Pressure for 20 minutes (rice porridge (congee)) “More” to High Pressure for 30 minutes or “Less” for High Pressure for 15 minutes (Oatmeal)
- Do not use Quick Release!!! High starch content creates a thick liquid that will spatter out and block steam release valve
8. Poultry
- Preset for Poultry i.e. chicken, duck, turkey
- Default to a High Pressure for 15 minutes, “Less” for High Pressure for 5 minutes, and “More” High Pressure for 30 minutes (fall off the bone)
9. Rice
- Default for Rice, such as white rice, short grain rice, Jasmine and Basmati rice
- Defaults to cooking on low pressure for normal texture rice, “Less” has a shorter cook time for al dente rice and “More” has a longer cook time for softer texture
- Cook time is between 4-8 minutes depending on how much rice is being made
- Use a 1:1 rice to water ratio
- Pressurizing can take 10-12 minutes
10. Soup
- Default for “Soup” button to make broth, stock or soup.
- Instant Pot will control the pressure and temperature so that the liquid doesn’t heavily boil.
- You can adjust the cooking time as needed, typically between 20-40 minutes, and the pressure to either “Low” (No Meat), “Normal” (With Meat) or “High” (Bone Broth).
11. Steam
- Default button for “Steam” function can be used to steam fresh or frozen food such as vegetables, seafood, or meat.
- Utilize 1-2 cups of water to the inner pot, place the steam rack inside the inner pot and with a stainless steel steam basket on top.
- Adjust the time using the “+” or “-“ button, refer to the Instant Pot Manual for cooking times for various foods.
- Use the steam rack to keep food elevated and a quick release will help food from overcooking.
12. Keep Warm
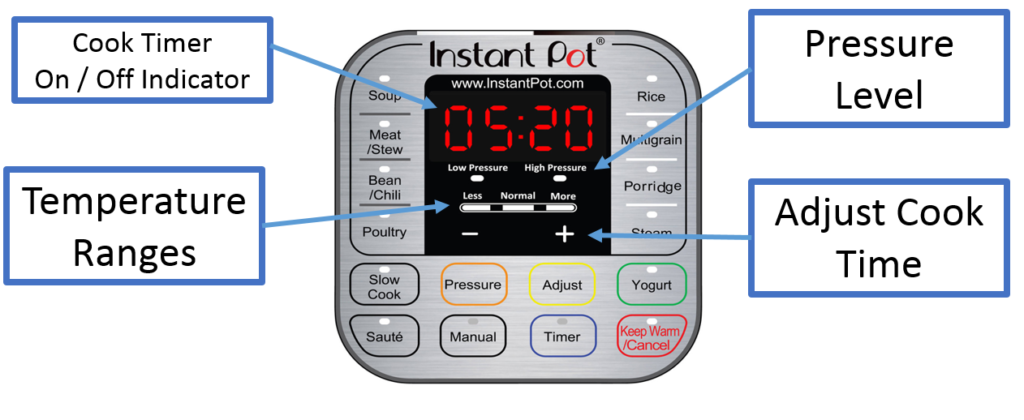
- Once the Instant Pot is done cooking, it automatically enters “Keep Warm” mode. It will display an “L” in front of a number to indicate how long it’s been warm – e.g. “L0:30” for 30 minutes. It’s a great feature to keep food warm (145 to 172°F) for up to 99 hours, 50 minutes.
- Use the Keep Warm Button to turn the Auto Keep Warm function ON and OFF
13. Cancel Button
- The Cancel key ends a cooking program at any time, or resets the cooker to factory default settings by pressing and holding this key until the cooker beeps
- Helpful if you need to change pressure settings, time or modes.
14. Timer / Delay Start Button*
- Use the Timer or Delay Start button to delay the cooking start time for the Instant Pot. This works for both pressure cooking and slow cook options.
- To activate the delayed start feature, just press the Timer button with 10 seconds of pressing either the Pressure / Manual button or Slow Cook button. Then Use “+/-“ buttons to adjust the delayed hours, then wait a second and press Timer again to set delayed minutes.
- You can cancel the Timer anytime by pressing the Keep Warm / Cancel button.
*New models of the Instant Pot have the “Delay Start” button and old models use the “Timer” Button
15. Yogurt
- Adjust to More for boiling the milk, use Normal for incubating the yogurt.
- Refer to a good yogurt recipe as making yogurt can be fairly technical.
16. Adjust
- On older Instant Pot versions, use this button to toggle from the Less | Normal | More settings. Press the feature you wish to use, then press Adjust until the light under Less | Normal | More is adjusted to the desired setting.
- Refer to the manual for a better understanding of how to use these settings with the preset buttons.
17. Pressure
- Switch between High and Low Pressure settings for pressure cooking programs. Works with all buttons that cook at High or Low Pressure.
18. “+” & “-” Buttons
- Increase or decrease the cooking time or timer with these 2 buttons
Our Product
Recipes from Pressure Cooker Passion
Instant Pot Baked Apples Recipe
Articles from Pressure Cooker Passion
11 Best Selling Pressure Cooker Cookbooks
How Does A Pressure Cooker Work? And Everything Else You Wanted to Know About Pressure Cooking
7 Health Benefits of Pressure Cooking
2 thoughts on “Instant Pot Button Guide”
Comments are closed.
It’s really a cool and useful piece of info.
I am happy that you just shared this useful info with us.
Please stay us informed like this. Thanks for sharing.
Thanks so much!